Export JAR file in Eclipse

In this tutorial, I will show you how to export your eclipse project into jar file.

Open Eclipse and the project you would like to make into JAR.

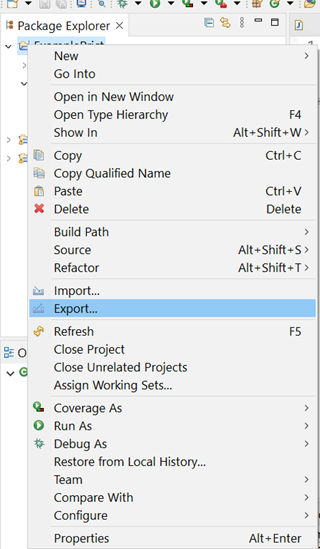
Right click on the project folder in Eclipse -> Export, just as it is shown in the figure below.

Figure 1.1. Export option in Eclipse file expolorer

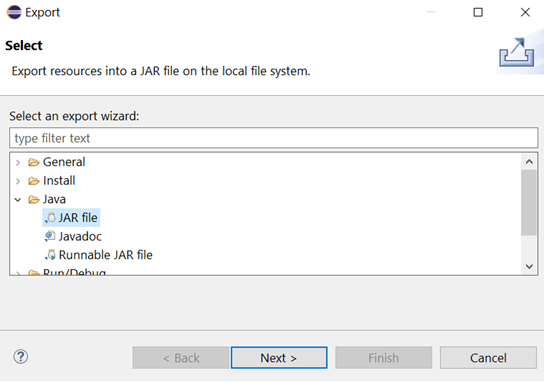
After clicking on Export there will be displayed prompt, which looks similar to Figure 1.2.

Figure 1.2. Ecplise Export prompt

On this prompt select JAR file. This will take you to the next prompt (Figure 1.3).

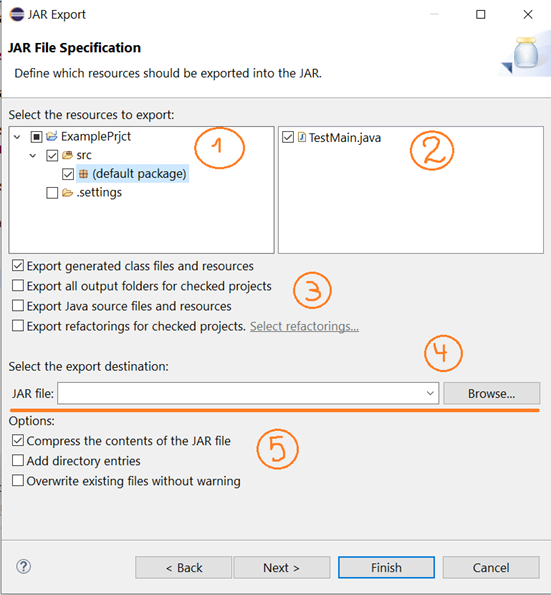
Figure 1.3. Export JAR File Specification

This is important step. In the part, where is marked with (1) you select the src folder and the files, which you want to include in the jar file. In (2) select them.

In (3) mark “Export generated class files and resourses”, this option will include compiled class files in the jar file.

The next step (4) is to select the export destination. That means where you want to be located the jar file. You can export it in desktop.

In (5) mark “Compress the contents of the JAR file”, which will compress the content and the jar file size will not be that huge. After this options, click NEXT.

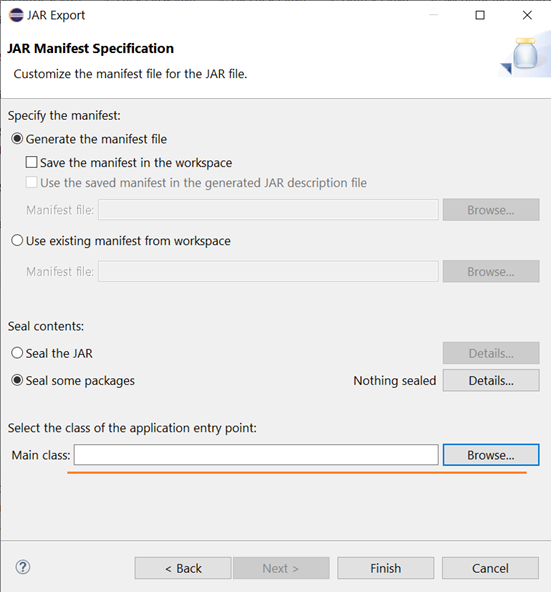
Figure 1.4. Jar Specification prompt.

The last export option prompt is for the Jar Specifications.  Here I have marked you the field, which you should modify. You should pick the class, which contains main() method. This is important step, if you want to make your jar runnable. After that you just press Finish and your jar file will be made in the destination folder.

The blog and wordpress.com platform

From around 1 week, I do stats check for this blog in wordpress.com. The platform has built-in analytics and I found that it has its bugs. In combination with the non-indexing articles in google. Actually, wordpress.com has this option, but ofcourse it is HAS to be paid. These two reasons brought the thoughts of moving the blog to its own platform. I would like to hear from you visitors, what do you think about moving this web site into different hosting platform and into different domain name. Do you use any hosting companies or github.io for hosting web sites and do you like the quality/price ratio? How about the space, which do they provide? Thank you!

Check your public IP addres using cURL

I. Introduction.

In this article, I will share with you a trick, which you could use to obtain your public IP address instead of going to site like whatismyip.com or similar.

II. cURL

cURL is free tool, which according to its original website is for transferring data with URLs. You can download it from here. It is free and open source.

As you may know, in the newest versions of Windows, you have cURL installed. If you are using older version of Windows, make sure you have it installed.

III. Obtain your public IP address.

Open Command Prompt or Terminal and type:

curl https://ipinfo.io/ip

After executing this, it will return your public IPv4 address.

IV. Conclusion.

In this article, you were shown little trick, which you can use, when you have cURL installed. You can check your public IP in your favourite terminal or command prompt. cURL is useful tool, which is not big (a few MBs).

Compile multiple Java classes in Command Prompt

I. Introduction.
In this article it will be shown how to compile multiple Java classes in console (Command prompt) or Terminal.

As a prerequisite you should have Java downloaded, installed and set the JAVA_HOME environment variable.

II. Compiling multiple source files in console.

The example project, which will be used contains two files:

  • MessageDeliver.java – Example file, which contains one private field and method
  • AppMain.java -> the main class, which calls method from MessageDeliver

MessageDeliver.java

public class MessageDeliver {
	private String msg = "Hello!";

	public String getMsg() {
		return this.msg;
	}
}

AppMain.java

public class AppMain {
	public static void main(String[] args) {
		MessageDeliver mDeliver = new MessageDeliver();

		System.out.println(mDeliver.getMsg());
	}
}

In order to build both files, open command prompt or terminal and type:

javac MessageDeliver.java AppMain.java

javac command calls java compiler. If you have configured correctly JAVA_HOME variable then in the folder, where are located MessageDeliver.java and AppMain.java should appeared two new files MessageDeliver.class and AppMain.class.

III. Running Java files from Command Prompt.

Running files after being compiled in Command Prompt is done by writing the following command:

java AppMain

IV. Conclusion.
In this article, It was shown how to compile multiple files and to run them in Command Prompt. The examples were done in Windows OS, but the process is similar in Linux terminal.

Thank you for reading this article! If you have any questions – feel free to ask in comments section.

Reflection API feature in Java – Overview

I. Introduction.

This is the first post from series of articles with main subject – Java reflection.
In this article, I am going to explain the basic concepts of reflection – what is it, when it is being used, why and show examples for its usage.

II. What is Reflection in terms of Java?

Reflection is powerful feature implemented in Java and it allows to the executing Java program to examine or to modify internal properties at runtime.

The packages, which are required in order to use the features, which Reflections API provides are in reflect, you can import them using following:

import java.lang.reflect.*;

Reflection gives an information about the class to which one object belongs to. In addition to that – the methods of the class that can be executed with the usage of the object.

III. Example – print methods of a given class.
Let see the feature in practice.

The demo contains following files:

  • Cat.java
  • CatRflDemo.java

in class Cat, we have following:

Cat.java


public String name;
private int years;
private boolean isHungry;

public void setName(String name) {
    this.name = name;
}

public String getName() {
    return this.name;
}

public void sayMEOW() {
    System.out.println("MEOW!");
}

In order to get and to print the methods, which are in Cat class, we use snipper similar to this bellow:

Method[] catMethods = Cat.class.getMethods();
for(Method mthd : catMethods) {
    System.out.println(mthd.getName() + "()");
} 

This will print all of the methods of class CAT.

After executing this, the following result will be printed in console:

getName()
setName()
wait()
wait()
wait()
equals()
toString()
hashCode()
getClass()
notify()
notifyAll()

As you may notice, there are methods, which are extended and aren’t written by us like toString().

IV. Example 2 – set value to a field.
Another great feature, which is part of Reflection API is the option to set value to a field.

I will use Cat class for this example. In the cat class, I added some fields. Here is it:

public String name;
	
private int years;
private boolean isHungry;
	
public void setName(String name) {
	this.name = name;
}
	
public String getName() {
	return this.name;
}
	
private void sayMEOW() {
       System.out.println("MEOW!");
}
	
public boolean isTheCatHungry() {
       return this.isHungry;
}

As you see there is new method called isTheCatHungry. In the main class put this:

Cat catObj = new Cat();

System.out.println("Is the cat hungry?" + catObj.isTheCatHungry());

Field flds[] = catObj.getClass().getDeclaredFields();

for(Field fld : flds) {
     if(fld.getName().equals("isHungry")) {
          fld.setAccessible(true);

  try {
        fld.set(catObj, true);
    } catch (IllegalArgumentException e) {
        e.printStackTrace();
    } catch (IllegalAccessException e) {
        e.printStackTrace();
    }

   }
}

System.out.println("Is the cat hungry?" + catObj.isTheCatHungry());

Here we create object of Cat called catObj and print the default value of the variable isHungry. After that, we need an array to store all of the declared fields, so this is what the purpose of flds array is. Followed by iteration through the array.

The line: if(fld.getName().equals(“isHungry”)) {}
checks the field, which is going to be accessed, which in this case is called “isHungry” and after this it is being set to accessible, so we could control it and on the next step it is being modified with the following method fld.set(catObj, true);

After running this snippet, the output will be something like this:

Is the cat hungry?false
Is the cat hungry?true


V. Conclusion.
Java Reflection API provides great variety of features. In this article some of them are being shown. Each feature provided by Reflection API has its advantages, but when using it, the dev should warn. Just as Oracle wrote it – if operation could be made without using reflection, it is preferable to avoid it. However, Java’s reflection API is really usefull and could help dev to learn more in depth how the stuff works inside VM.

In the next article from this series I will cover more details, explore more features of Reflection API, and give more in depth examples.

Thank you for reading this article! If you have any questions – feel free to comment.
Blog design refreshed

As you may notice – the blog is being redesigned. I picked a new theme, the previous was named “Motiff”. The new one is named “Hemingway rewritten”. This is first design update of the blog since its creation ( 2014 ).

This theme is modern, fresh, new and also – responsive.

Soon, I will update the pages. As you may see – I have added “blogs” section in which you may find some cool blogs.

I am not going to delete the old articles, but I may do archive them if is there such option in wordpress. 🙂

WordPress hasn’t deleted this blog yet and that’s cool

It’s been a long time since my latest post here. I would like to say thanks wordpress.com team, because they haven’t deleted this blog. Thank you!

WordPress has changed a lot for 3 years ( or more ). There is a brand new post editor, which isn’t bad, but I don’t like it that much.

The image in this post is not mine, I downloaded it freely from the net.Here is the author of the image: https://unsplash.com/@aniketh_kanukurthi

My new blog is finished and

Hello everyone!
There are 2 new projects that I’ve finished.The first one is my new blog.
It’s written in php with MySQL database, html and css.The design is created by me also.If you want, you can see it here: Here.

My second finished project is my Pong Game.Yes! You heard right! I made simple pong! 😛 If you want to play it click here.Here you go one screenshot:

My pong game

Also I want to tell you that I decided to make blog posts on English and/or sometimes on Bulgarian.I will separate articles by categories.Articles in category Bulgarian will be written on Bulgarian.And that’s it.